Monday, June 25, 2012

95% Complete!


We met our deadline (Monday June 25) of having the project near completion. We worked like crazy this weekend and we are proud to say we completed many of the piece and they look incredible. The remaining work is focused on the back and creating attachments. We have about 15 days to go, wish us luck!


This is not the final version. We still have many changes coming including color paint and aluminum tint changes. Check back in a 2 weeks for some amazing finished product photos. 

I am not wearing any of the back pieces in this photo. We are working on the straps and buckles. We also have to merge the collar to the back plate. We took more photos but we don't want to put too many up until we are a little closer to finished.

This is our first time doing anything like this so we have been learning a lot along the way. This project turned into much more than we ever expected, its been crazy and difficult, but its also been a blast!


Attention blog readers: My husband (aka Naughty Zoot) is going to make a special Announcement about the our project in about a week. It is a major undertaking and it is an entirely different component of the project. Check our blog again to see what it is!

Progress Update 6.25

My man completed the collar this weekend and it looks incredible! Each layer of aluminum was cut and sanded to fit perfectly together, there is a lot of detail so this was very time consuming.

We hit a couple bumps in the road this weekend, here are just a few:

- When screwing on the bicep plate to the connection my husband accidentally screwed all the way through the plate. We had to rip off the top piece of aluminum and start again with cutting and sanding the aluminum, this redo took at least 2 hours.

-We also had a great deal of trouble with coloring the aluminum on the collar. We put paint down then tried to attach the raised detail pieces and they wouldn't stick. We had to remove all the paint and start over. We then couldn't get the pieces to stick on properly, several tries later we were ready to paint. We had to tape off all the raised parts first (the negative space received paint) and paint. After the paint dried, we had to tape off all the lowed (painted) parts so the raised pieces could receive tinting and a clear coat of shellac.

Sorry for not having a finished picture, there should be one in the next blog post.


We painted the outer part first, then we had to tape off all the area that had been painted so the raised layers could be tinted with ink.


We also created the kneecaps and the connections. They still need to have foam placed inside for comfort and they need be painted. We bought a great vice for the workshop which has made bending the aluminum a lot easier.


Upper Leg plates

We have not updated the blog in a while but we have accomplished a lot over the past two weeks. We met our unofficial deadline to have the project 95% complete today (June 25). The thigh pieces were really difficult. We completed the lower part a couple weeks ago and have been putting off the upper plate because it was so complicated. Below you can see how we cut into the middle layer up at the top so we could weave a strap in and out, and then around the waist.

 We sewed detail straps (for around the legs) and obtained a thick fabric material to connect to the upper part- pop rivets and super glue were used to attach them to the aluminum.The following layer then contained 2mm foam to conceal the pop rivets and give the layers more height.


Above you can see the middle layer on the upper part have the slots for the straps the weave in and out. It essentially created a pair of "space chaps". This was a very difficult piece of the project!

Monday, June 11, 2012

Update June 11

We are really moving along, it seems like we are completing pieces everyday. We have about 2 weeks until our unofficial deadline to complete the project (the official deadline is July 10).

Coloring the aluminum
A number of people have asked whether we were going to keep the aluminum in its natural color - which is super shiny - or paint it. We always wanted to color/darken the aluminum, it just took a long time to figure out how to do it. Painting works, and it was out backup plan, but we wanted it to retain the metal look. We decided to use ink to color the metal, we then sprayed it with a clear coat finish (shellac). Each of the four coats was separated by 24 hours to allow it to set (anything less resulted in a lot of scratches).
Word of advice: This is not a preferred method, it is difficult and unreliable. We would recommend obtaining aluminum in the color you want before you start. Aluminum can be colored, but it usually requires anodizing or a chemical bath.


We painted the back plate and cut it to shape. It now lines up nicely on the sides with the chest plate. We still need to create the buckle connections for the back plate. We are going to make a new aluminum piece to cover the long red lights.


The gloves are ready to be glued.


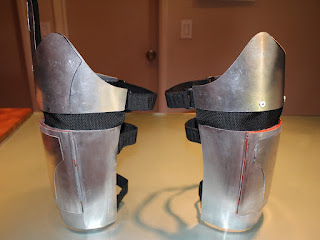
The previous post contained picture of me wearing the forearm pieces however, the aluminum had not been painted at that point. Here is the completed piece (below).


Wednesday, June 6, 2012

N7 Forearm plates


We finished the forearms! The final version will have the paint on the inner arms plate. The right arm top plate has the stripe and the left arm will be tinted to a darker color.


We added a strap detail on the inner arm plate


I love the little elbow cap thing. This is the pre-painted version. 

Update June 6


For the inner bicep pieces we created a slip double layer slipcover.We drilled holes and filed them down to create slots for the straps to weave in and weave out. We then filled the other area with thin foam. The cover then slipped on smooth over top. We are going to glue and paint them, then screw the outer bicep plate (i.e. the stripe) on to the elastic strap. The entire bicep piece will become a slip on. 


The picture below shows the abdomen plates in progress complete with beveled edges. We will be sewing leather to my shirt and then gluing the pieces on to the shirt. Will we will be paining and tinting all the aluminum on the costume.